Remote Book Scanning with 1DollarScan and Optimizing Scanned PDFs
Using The Service
Last month, I got interested in a textbook recommended by an online open course I happened to find. However, it’s quite old and not easily available for international shipping. Plus, since it’s in the “reader” format meant to be read non-sequentially and piecemeal, carrying it in its 600-page physical form seems to defeat the purpose.
That was when I thought of the book scanning services I had heard about in the past and decided to try 1DollarScan.com, a service mentioned in multiple Hacker News threads.
Essentially, 1DollarScan offers to receive books sent either by yourself or from an online bookstore where you ordered, scan them, and deliver the resulting PDFs before recycling the dead trees. You may be able to negotiate a similar deal with a printing shop, but 1DollarScan leads by making the process streamlined and automated.
The book I wanted was available secondhand on Amazon for as low as $3–4 (down from the criminal $140 for a new copy — that’s what happens with a monopoly); it seemed promising that I could get the tome digitally for a few bucks.
Ordering
The service, however, turned out to be more costly than its name suggests. The unit price had actually increased to $1.2 per 100 pages (a “set” in their parlance). Sets are always rounded up, so you will pay extra for the last dozen pages.
There’s more to spend. In the order process, 1DollarScan tries to upsell with some extra options, which initially seem affordable at $1–2, until you realize the prices are also per set and add up quickly. Amusingly, the two add-ons that are selected by default — OCR ($1) and file names matching book titles ($1) — almost invite an instant opt-out, given how easily you can self-service.
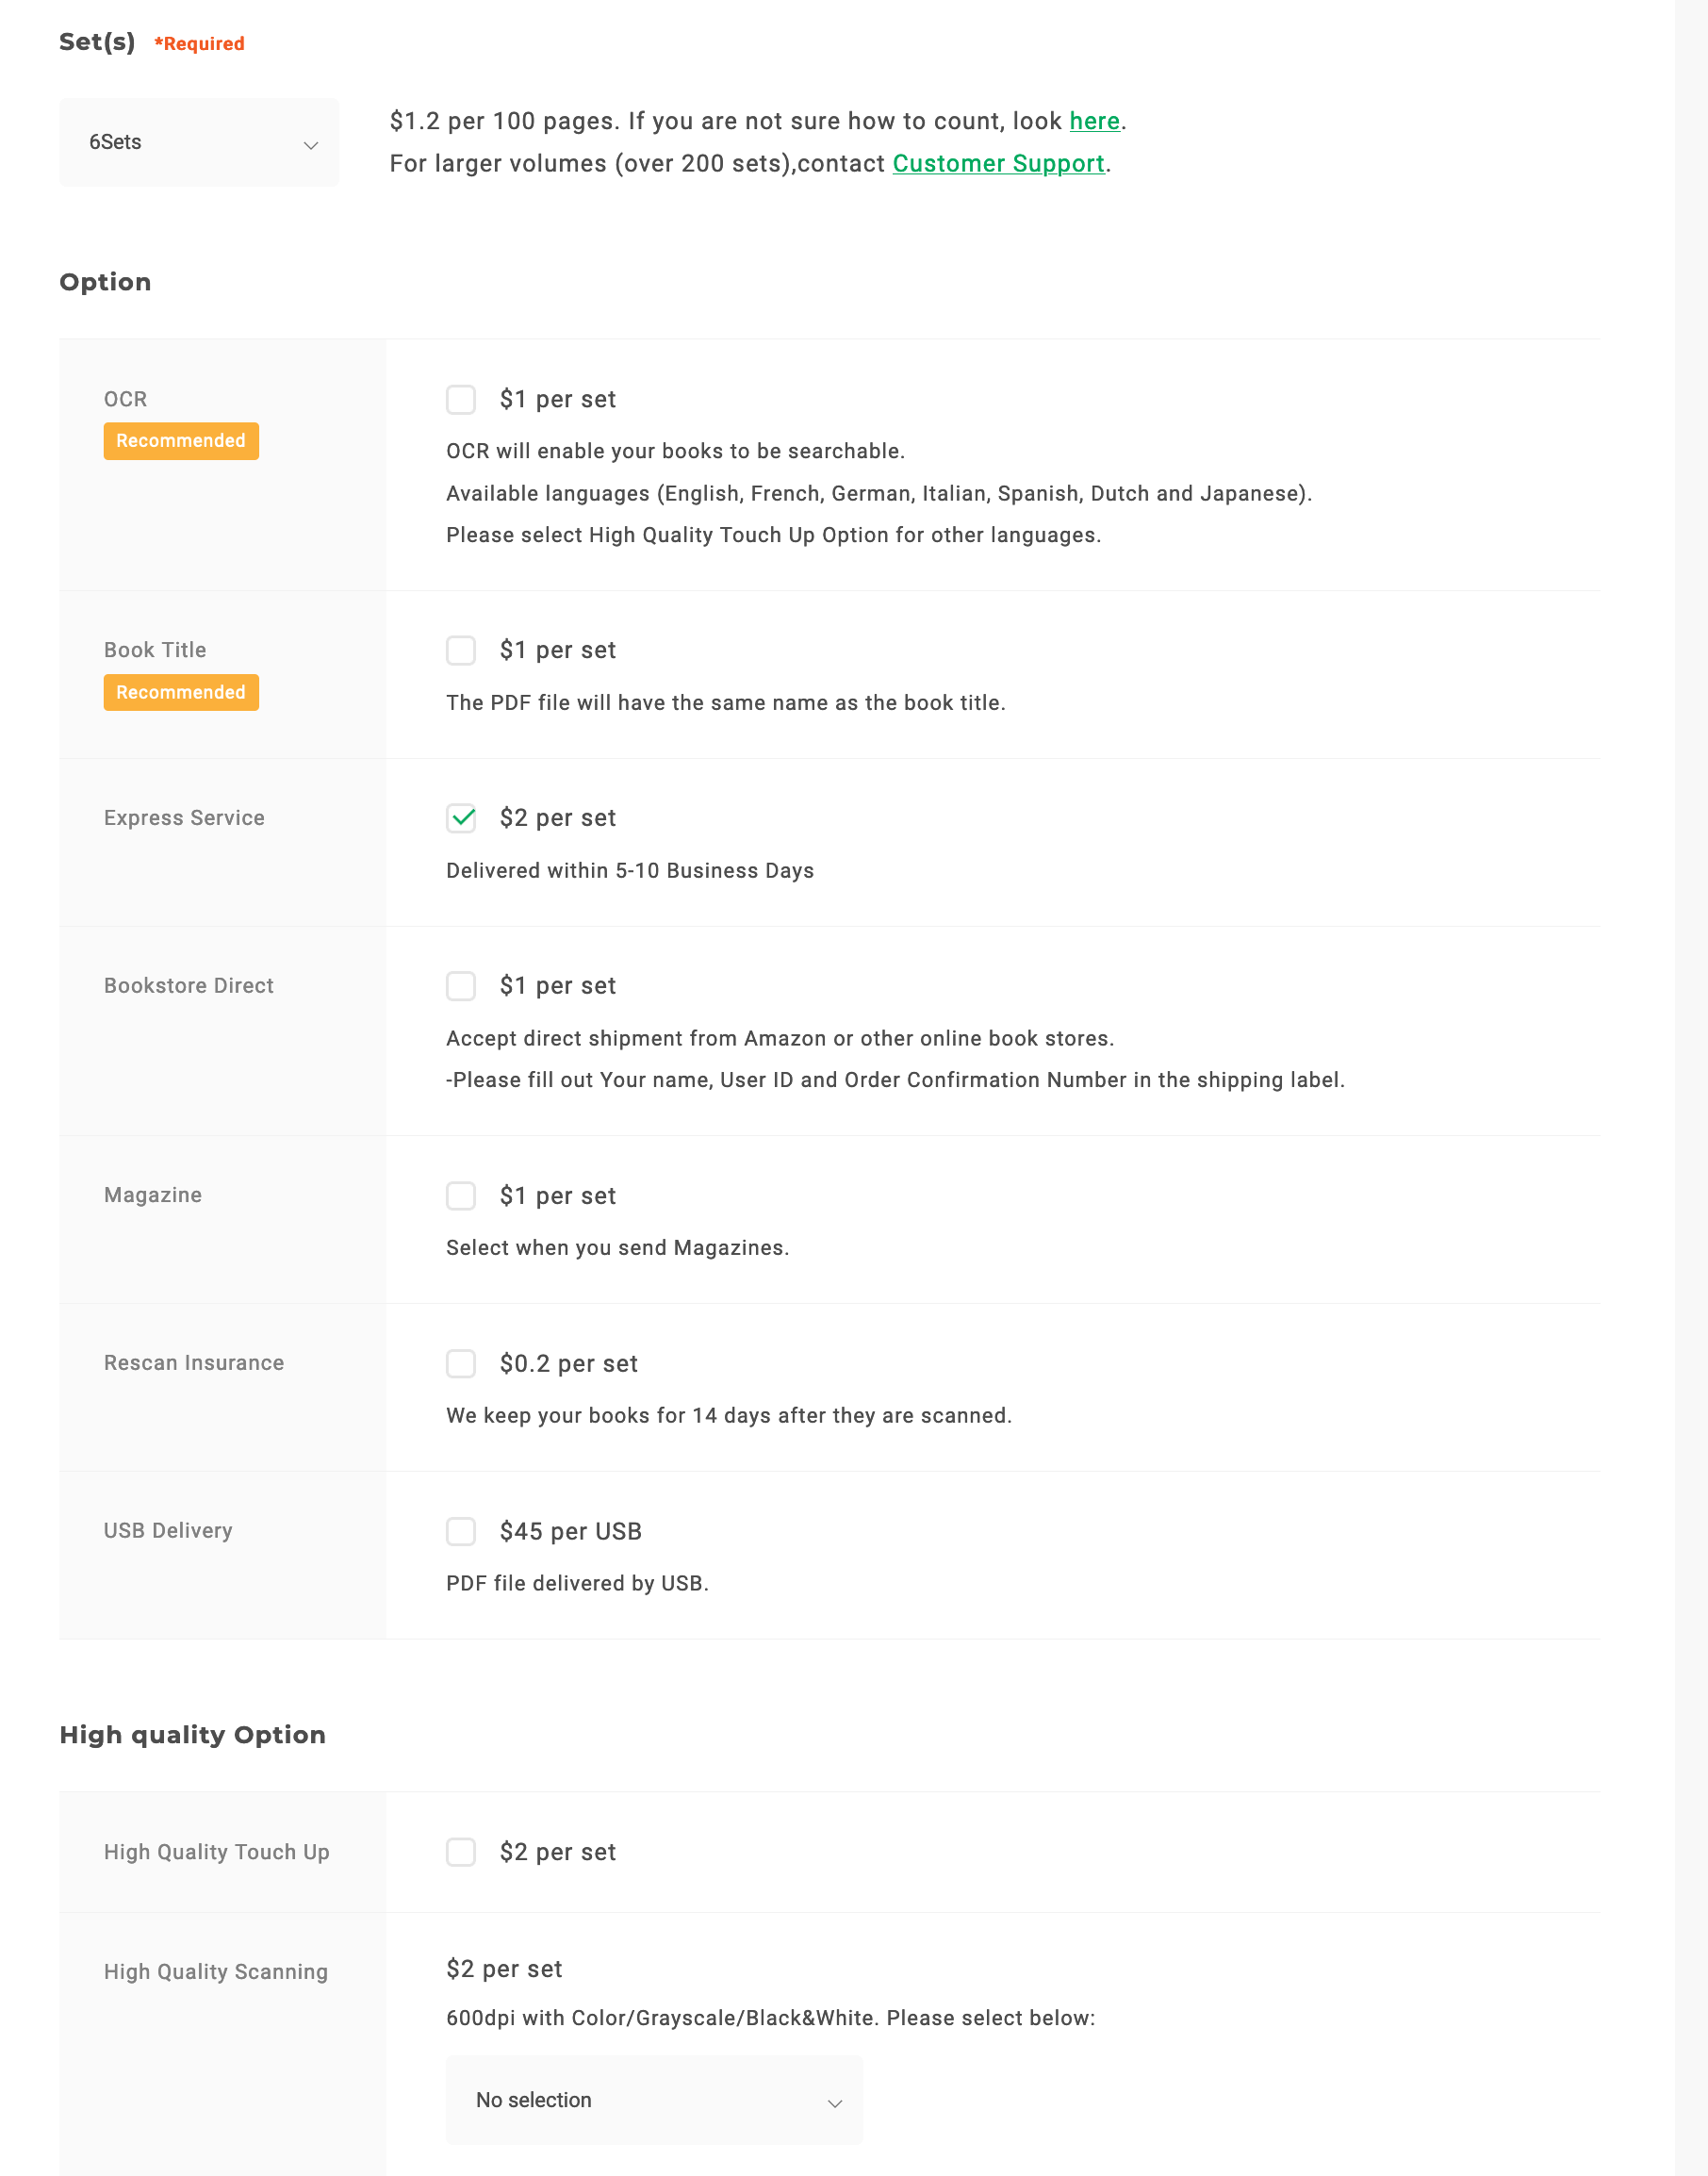
On the other hand, you do want to pay an extra $1 per set so that they will accept direct shipment from Amazon, and $2 per set to reduce the turnaround time from the insanely long 40–60 days to 5–10 business days. With those two add-ons, the estimated cost of scanning my textbook would be ($1.2 + $1 + $2) × 6 = $25.2, much higher than I imagined. (You can also pay $2 per set for a “high-quality touch-up” with an increased scanning resolution from 300 to 600 dpi and manual correction of images; I decided it was overkill for my book.)
Sophisticated shoppers would smell a subscription at this point — and hola, for $19 a month, you get credits for 10 sets and every add-on other than high DPI included. I didn’t expect to send them another book within a month, but by basic math, it would indeed sweeten the deal. So I signed up for the membership, ordered the book from Amazon, and started waiting. (The membership seems to be offered in limited spots and is not always open for purchase.)
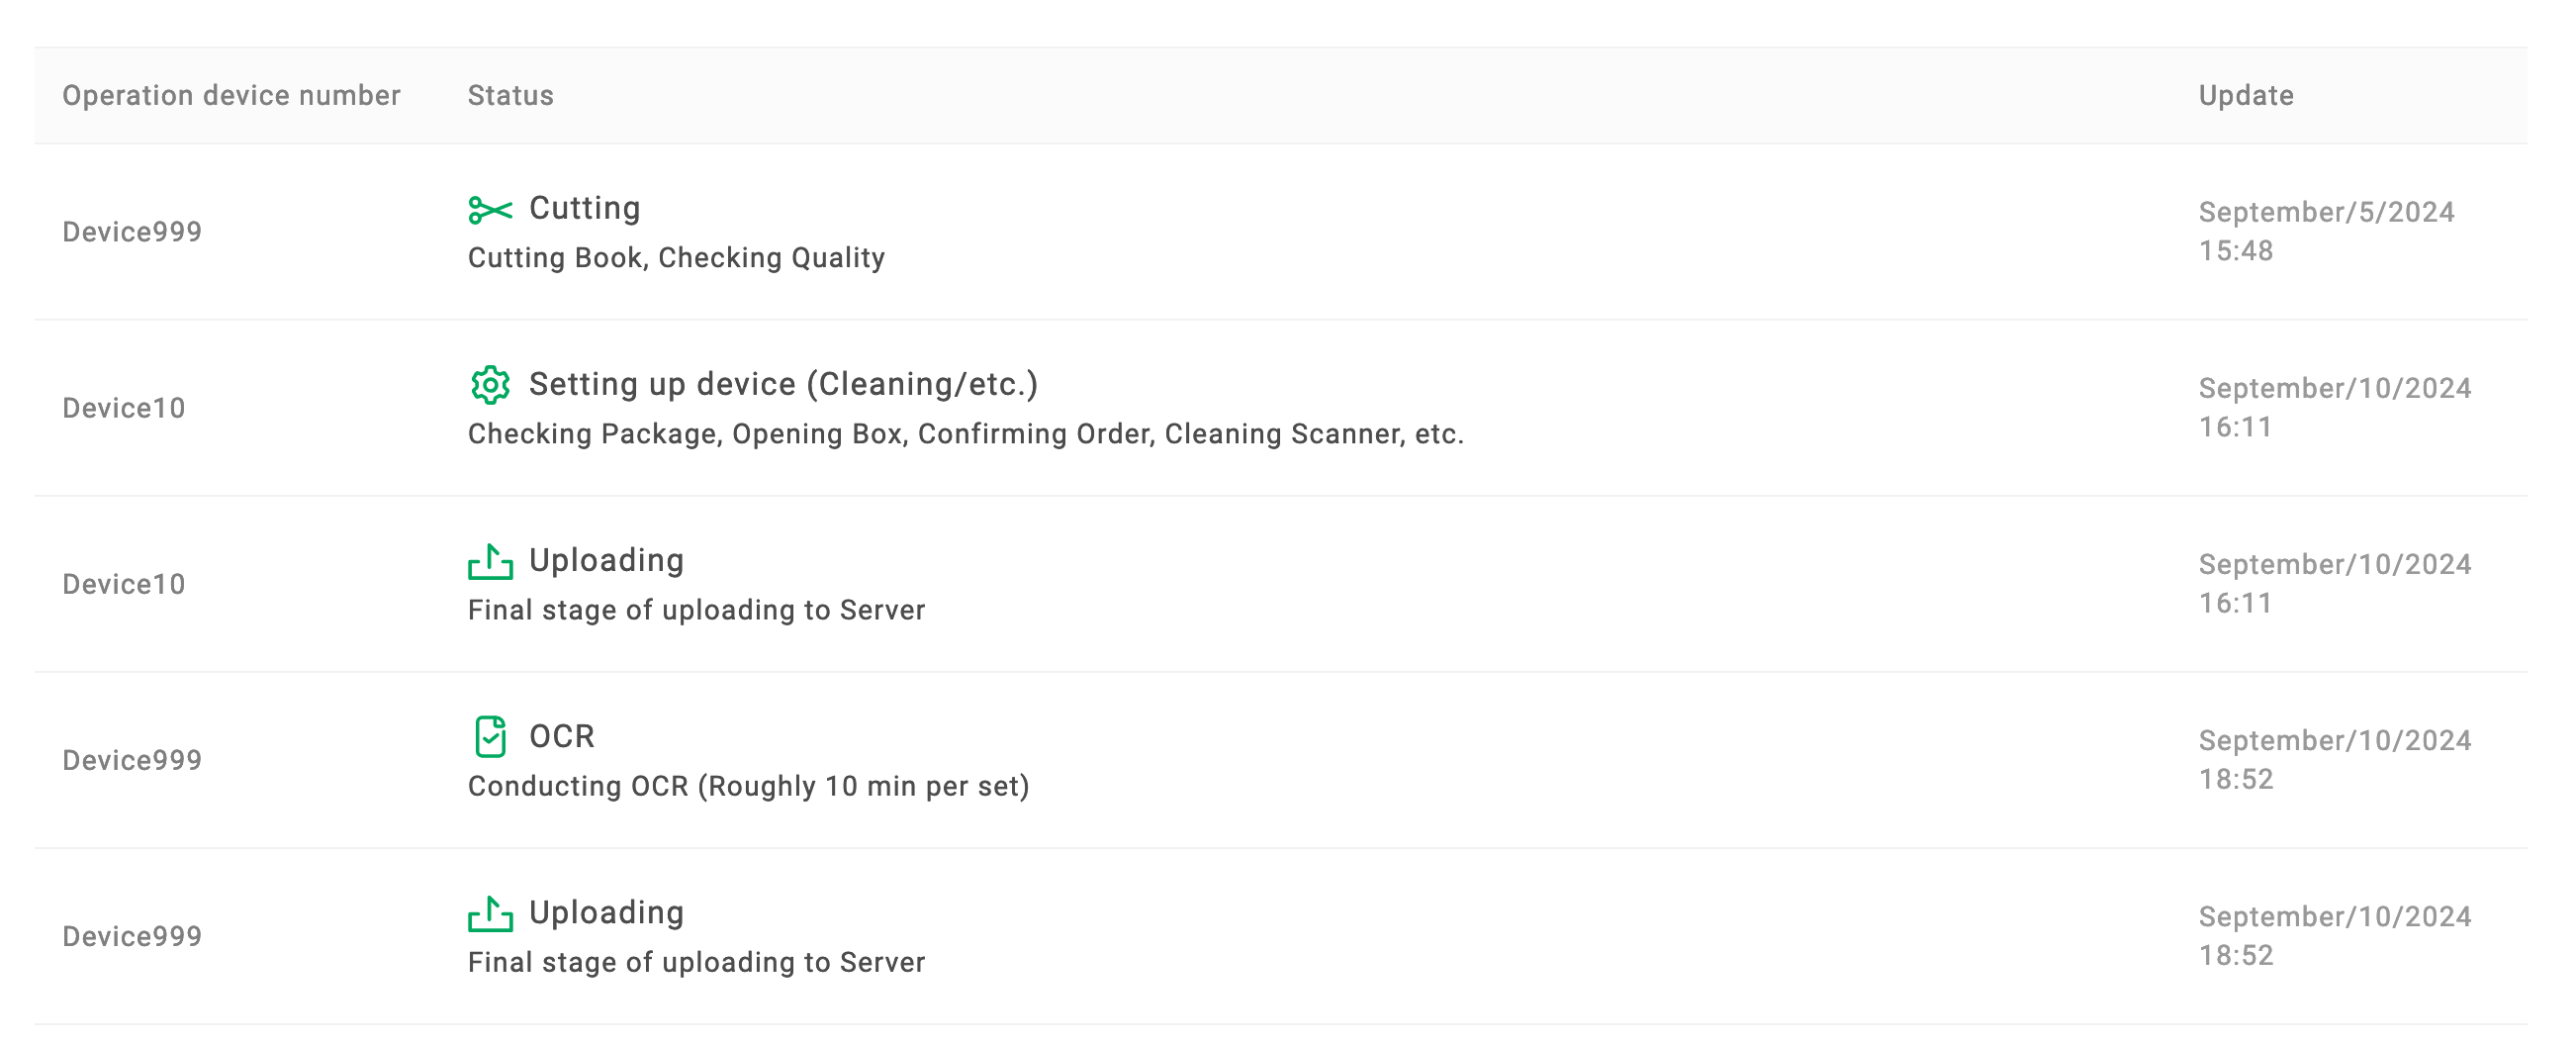
…For loooong. The Amazon package arrived at their facility on Aug. 28 and took two days to be identified on my account. The scanning didn’t take place until Sep. 5 and took another five days to finish, during which the status page simply said “cutting.” Technically, that adds up to six business days, Labor Day considered, and was up to the promise, but it did feel sluggish for a single book.
(As a comparison, I randomly picked a Chinese scanning shop on Taobao and sent a book for scanning for 0.05 yuan, or $0.0071, per page. They delivered the PDF in less than two hours after receiving the book.)
Delivery
After waiting, the output file was delivered via a direct link valid for thirty days. There was also a free option to “fine-tune” the file or to perform downsampling and margin removal to adapt to the target device you select. Unfortunately, the device list is outdated by at least six years, and the compression is so aggressive that it jeopardizes readability, so don’t bother.

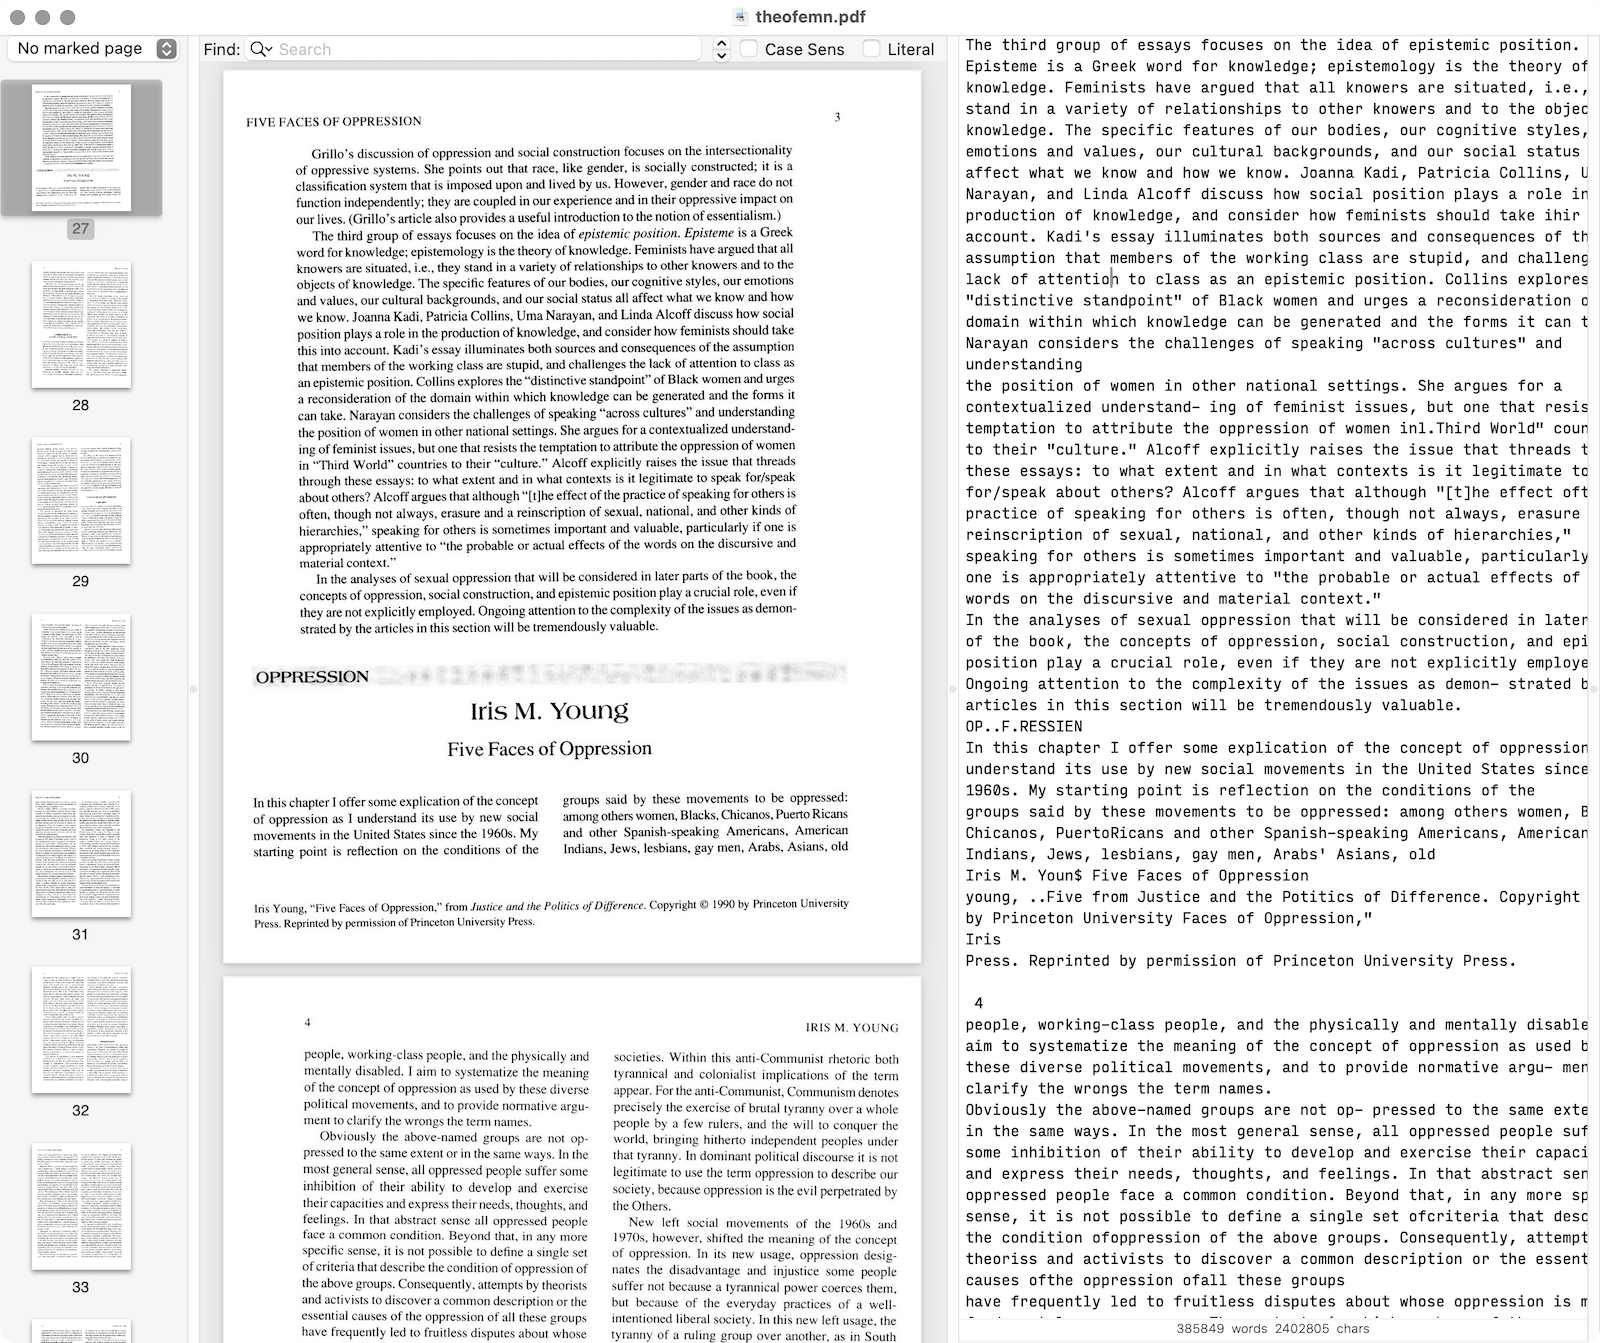
As for the scanned book itself, the image quality was generally good, but the contrast erred on the lower side, making the serifs on some letters fade; some pages are also slightly skewed by 0.5–1 degree, which is nothing serious but discernible. The OCR was accurate but occasionally struggled with the columned layout. The 433 MB footprint for a 600-page book suggested the file was built with images directly out of the scanner. If the book were rich with color and images, the approach would’ve been appropriate; but for a textbook, it was far too inefficient.
Overall, I’d give my experience with 1DollarScan a B-: It did exactly what it promised, but given the price, it’s not unreasonable to expect more care given to transparency in pricing, issuing updates on progress, and the efficiency of the file format.
A Note on Legality
The legality of book scanning is unfortunately murky. Because copying the entire book inherently interferes with the copyright holder’s exclusive right to reproduce the work in copies (17 USC § 106), doing so is legal only if it constitutes fair use (17 USC § 107).
When determining if a use is fair, courts consider four factors holistically, with no single factor being determinative: (1) the purpose and character of the use; (2) the nature of the copyrighted work; (3) the amount and substantiality of the portion used; and (4) the effect on the potential market for or value of the work.
For users, a fair use argument seems more plausible because the Supreme Court has ruled in a case of time shifting that making individual copies of a complete work for later viewing is fair use. And practically, it’s unlikely you will get in legal trouble merely for scanning a few books with them; the stake is too low to raise concerns. (This is not a legal advice.)
For the service provider, however, the analysis is more challenging. While Google Books’ digitization was famously found noninfringing, the archiving wasn’t sold as a service, and the public display of text was limited. More recently, the Internet Archive’s scanning of the complete books was found to fail the “transformative” element. Of course, the private, temporary nature of copies produced by a book scanning service like 1DollarScan might mitigate some concerns, but that argument hasn’t been tested before a court, so no one can be sure. (1DollarScan seems to be aware of the legal risks as they expressly refuse to scan materials by some litigious publishers.)
Optimizations for Better Quality
As mentioned, the PDF delivered by 1DollarScan had issues such as low contrast, skewed pages, and a large file size. I decided to optimize it myself.
Note: I have few prior knowledge with image processing; the solution is based on quick research and may contain errors. Critical comments are welcomed.
Inspecting and Splitting the PDF
First, let’s check why the file is so huge:
pdfimages -list book.pdf
Note: pdfimages is a part of the poppler package.
The output:
page   num  type   width height color comp bpc  enc interp  object ID x-ppi y-ppi size ratio
--------------------------------------------------------------------------------------------
   1     0 image    2251  2766  rgb     3   8  jpeg   no         4  0   300   300  895K 4.9%
   2     1 image    2251  2766  rgb     3   8  jpeg   no         8  0   300   300  127K 0.7%
   3     2 image    2134  2773  rgb     3   8  jpeg   no        12  0   300   300  173K 1.0%
   4     3 image    2134  2773  rgb     3   8  jpeg   no        20  0   300   300  244K 1.4%
   5     4 image    2122  2768  rgb     3   8  jpeg   no        27  0   300   300  130K 0.8%
...
So, Color images are used even for mostly monochrome pages. To fix this, we first need to export all individual images:
pdfimages -j book.pdf book
This command outputs files like book-000.jpg, book-001.jpg, etc.
Touching Up with ImageMagick
Then we can perform touch-ups with ImageMagick. After some attempts, the combination of options I settled on was:
for i in book*jpg; do
magick "$i" \
-deskew 40% \
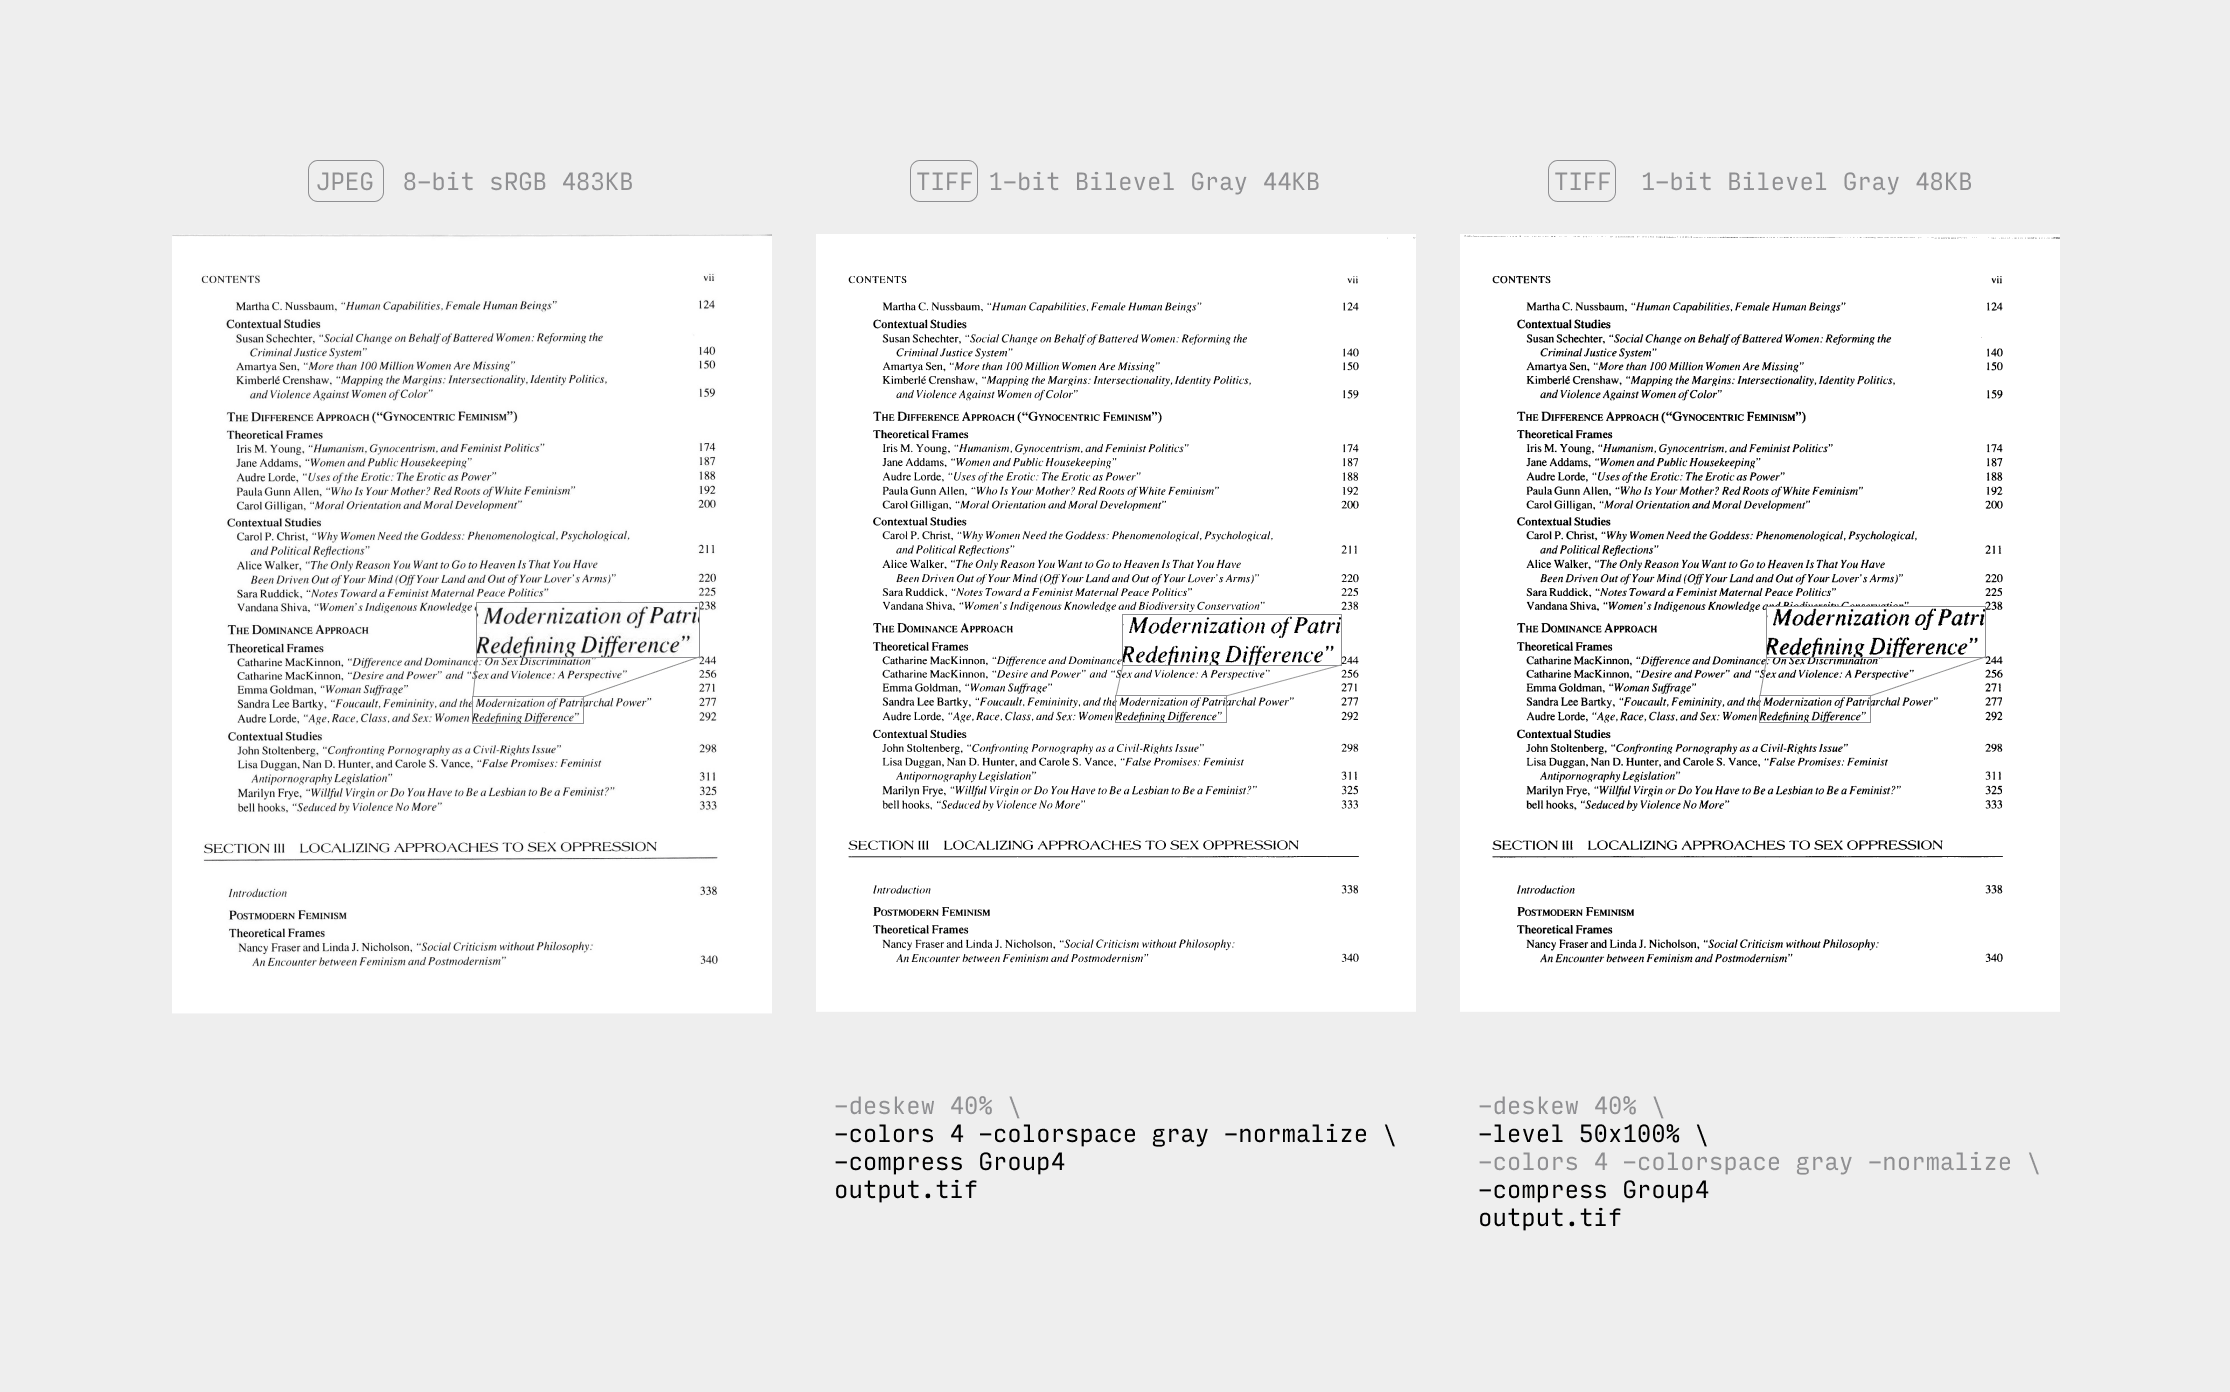
-level 50x100% \
-colors 2 -colorspace gray -normalize \
-compress Group4 proc.${i%.jpg}.tif
done
What the command does is as follows:
Deskewing. First, the -deskew threshold{%} option attempts to straighten the image. According to the documentation, a threshold of 40% works for most images, and so it did in my case.
Increasing contrast. The -level black_point{,white_point}{%} increases the contrast to save the thinner parts of characters on the scanned page from resolving into the background. Here, a black point value of 50 effectively clips the darkest 50% of the tonal range to pure black.
Note the order of options is significant for magick: the contrast must be increased before the desaturation step below, or it would be too late because the lighter shades would already have been turned into white by then.
Desaturation. The next few options make the image monochrome. ImageMagick does provide a -monochrome option, but it comes with a side effect to maximize the most light and dark pixels, which in my tests would introduce artifacts to some pages.
Thus, I used the combination of -colors 2 and -colorspace gray instead, that is, to pick only two colors to dither the image and then make it grayscale. The -normalize option thereafter enhances contrast by stretching the range of intensity values.
Compression and output formatting. In the final phase, the -compress Group4 option applies Group4 fax compression, a lossless method particularly efficient for bi-level images, and saves in TIFF format. In my case, it consistently reduced the image size by nearly 90%. (JBIG2, another algorithm for compressing black-and-white images, can theoretically save more space, but I didn’t find how to use it directly with ImageMagick. If you perform OCR with OCRmyPDF or Acrobat thereafter, they would convert the images to the JBIG2 format, though.)
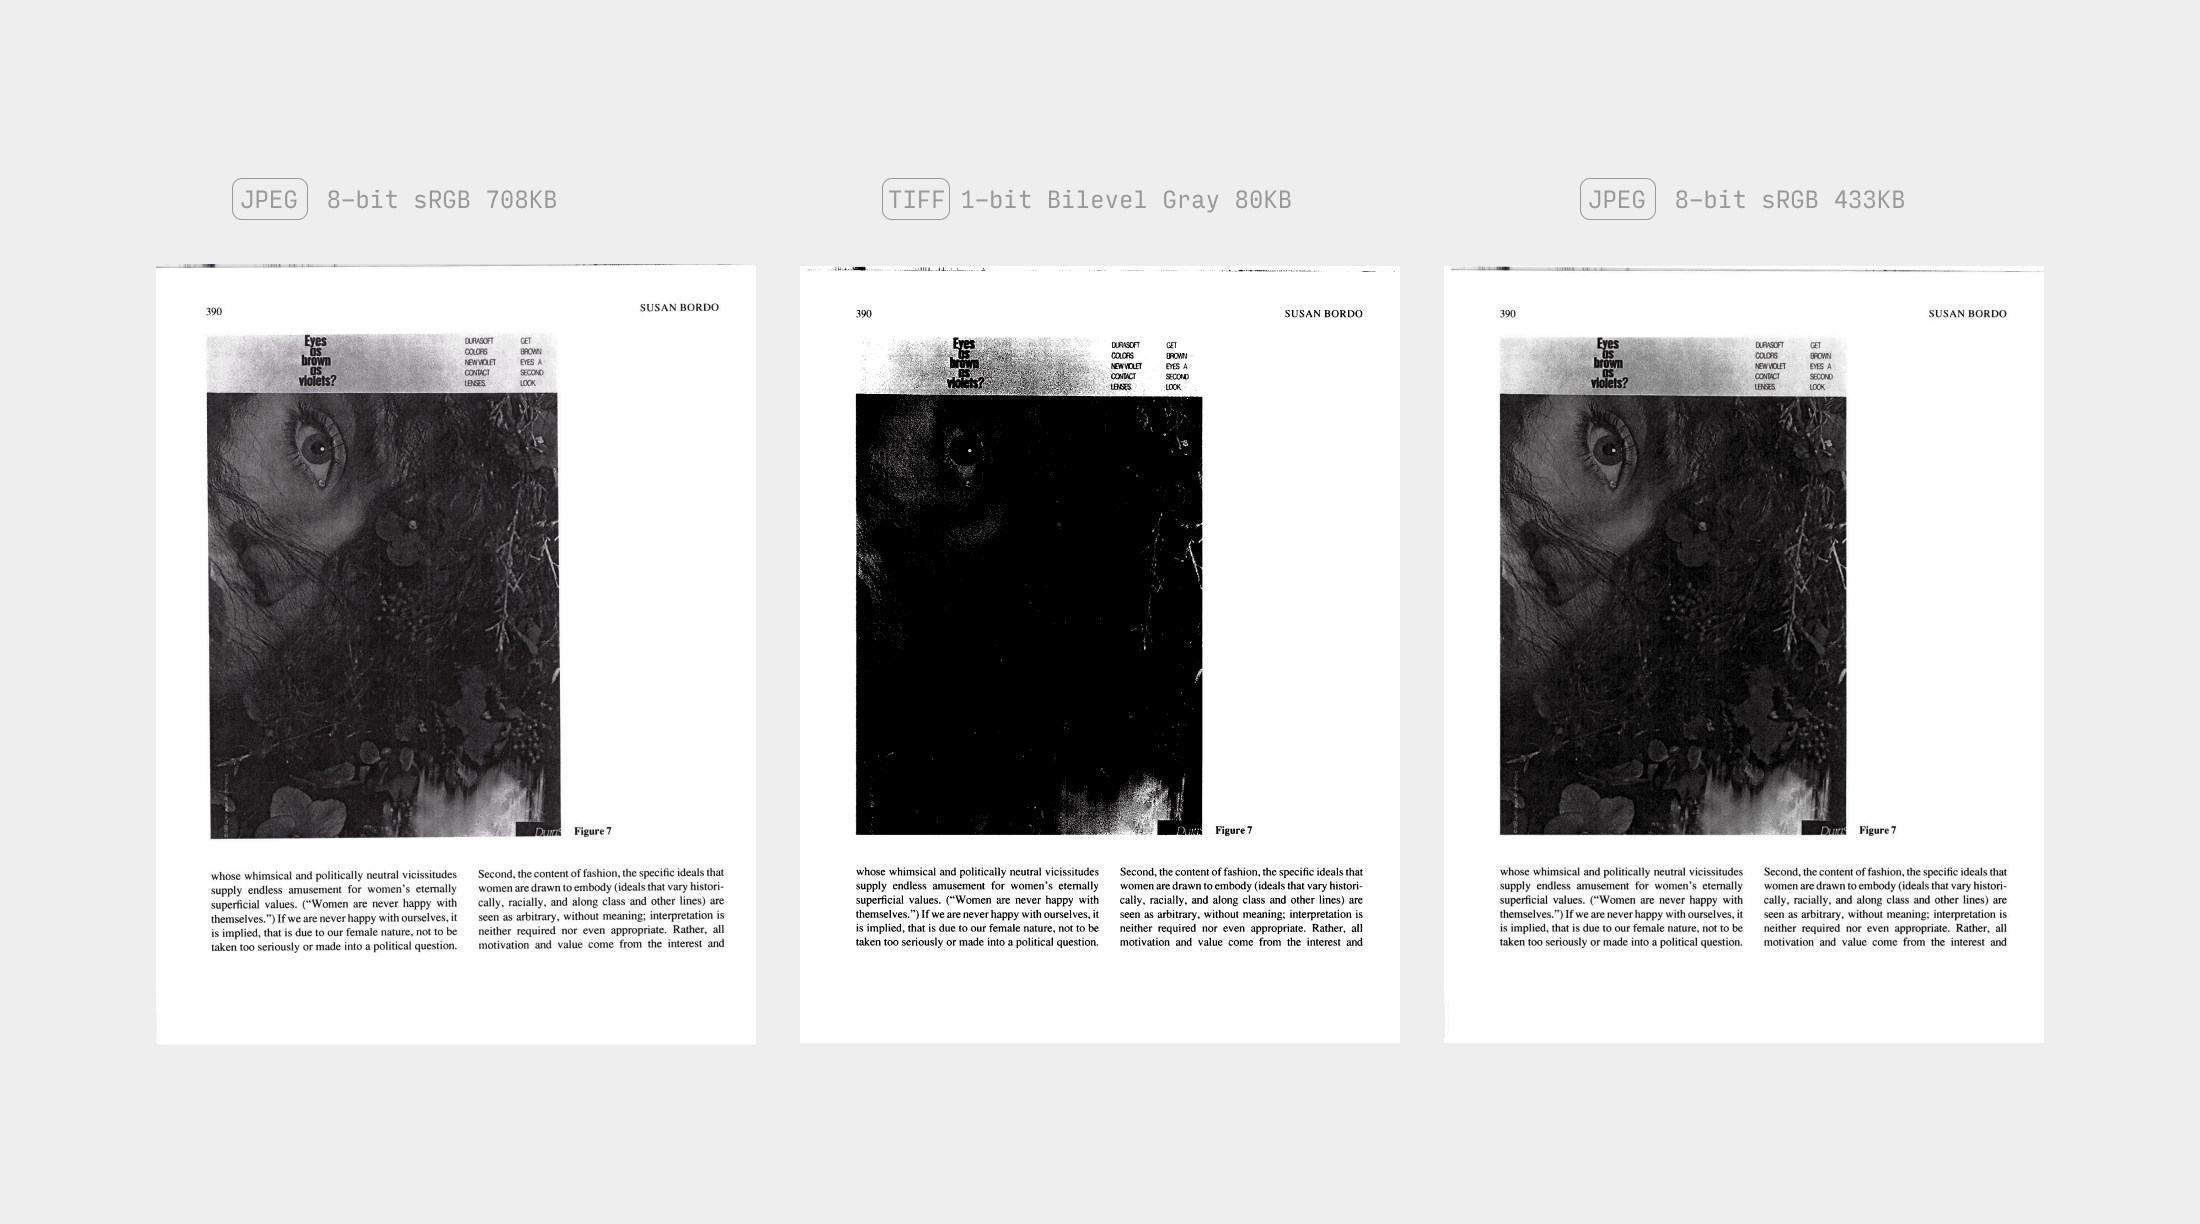
Accommodating Pages with Pictures
The command above turned out to work for most of pages, but not all. There was an article with lots of pictures that didn’t look good compressed into pure black and white. For those pages I used this command instead:
for i in {408..424}; do # range of pages requiring special treatment
    magick "$i.jpg" -deskew 40% -colorspace gray -depth 4 "proc.$i.jpg"
done
Here, instead of compressing to the bi-level, the -depth 4 option allows for a greyscale of 16 (2^4) levels. Then, I send the output to ImageOptim for a lossly compression at 60% quality; the result was about 40% smaller.
Performing OCR
Having optimized the individual pages, the next step is to combine them again and perform OCR. If you prefer opensource tools, tesseract does a decent job recognizing English documents:
find . -name 'proc*' | sort | tesseract - book.ocr pdf
Here, - reads from STDIN and the last two arguments are the basename (without extension) and output format, respectively.
However, tesseract in my case messed up with the columned text, so I ended up using Acrobat, which delivered near perfect output. (I hate Adobe like eveyone else, but it must be acknowledged it still has an unparalleled edge in PDF processing, moreso dealing with Asian language documents that I often have to process.)
Creating ToC
I wanted to finish up with an embedded table of contents. I could manually mark the pages in Acrobat, but that would be too tedious.
To the rescue comes PDFtk, which supports writing ToC into PDF programmatically. To do so, you need to prepare a bookmark data file in the format as follows:
BookmarkBegin
BookmarkTitle: (title)
BookmarkLevel: 1
...
Note: The official installer of PDFtk Server doesn’t work on an Apple silicon Mac. Use brew package pdftk-java instead.
But how to get the titles and page numbers? Traditionally, you can copy the text from the OCR’ed ToC pages, and clean them up with some regular expressions and vim wizardry. But it’s 2024 so a simpler way is just to ask an LLM to do the errand for you, and the cheaper models like Gemini Flash and GPT Mini suffice. Here was my prompt:
The text below is copied from an OCR’ed table of contents. Try to fix errors,
extra/missing spaces, and other artifacts introduced by OCR and separate the
entry and page number with a tab (\t). Note that some entries may span two
lines, but your result shouldn’t break within an entry. Output in a code block.

[Pasted OCR text of ToC pages]
For which Gemini Flash gave an impeccable result.
Then we need to account for the differences between the page numbers of the physical and digital copies. To do so, paste the output into a spreadsheet (that’s why I asked the output to be tab-delimited), and use formula and autofill to create a new column holding numbers equal to the physical page number plus the offset (easily calculated by comparing a pair of corresponding numbers).
Next, hide the column of physical page numbers, create three new columns holding the data file keywords (including newlines) like in the screenshot below.
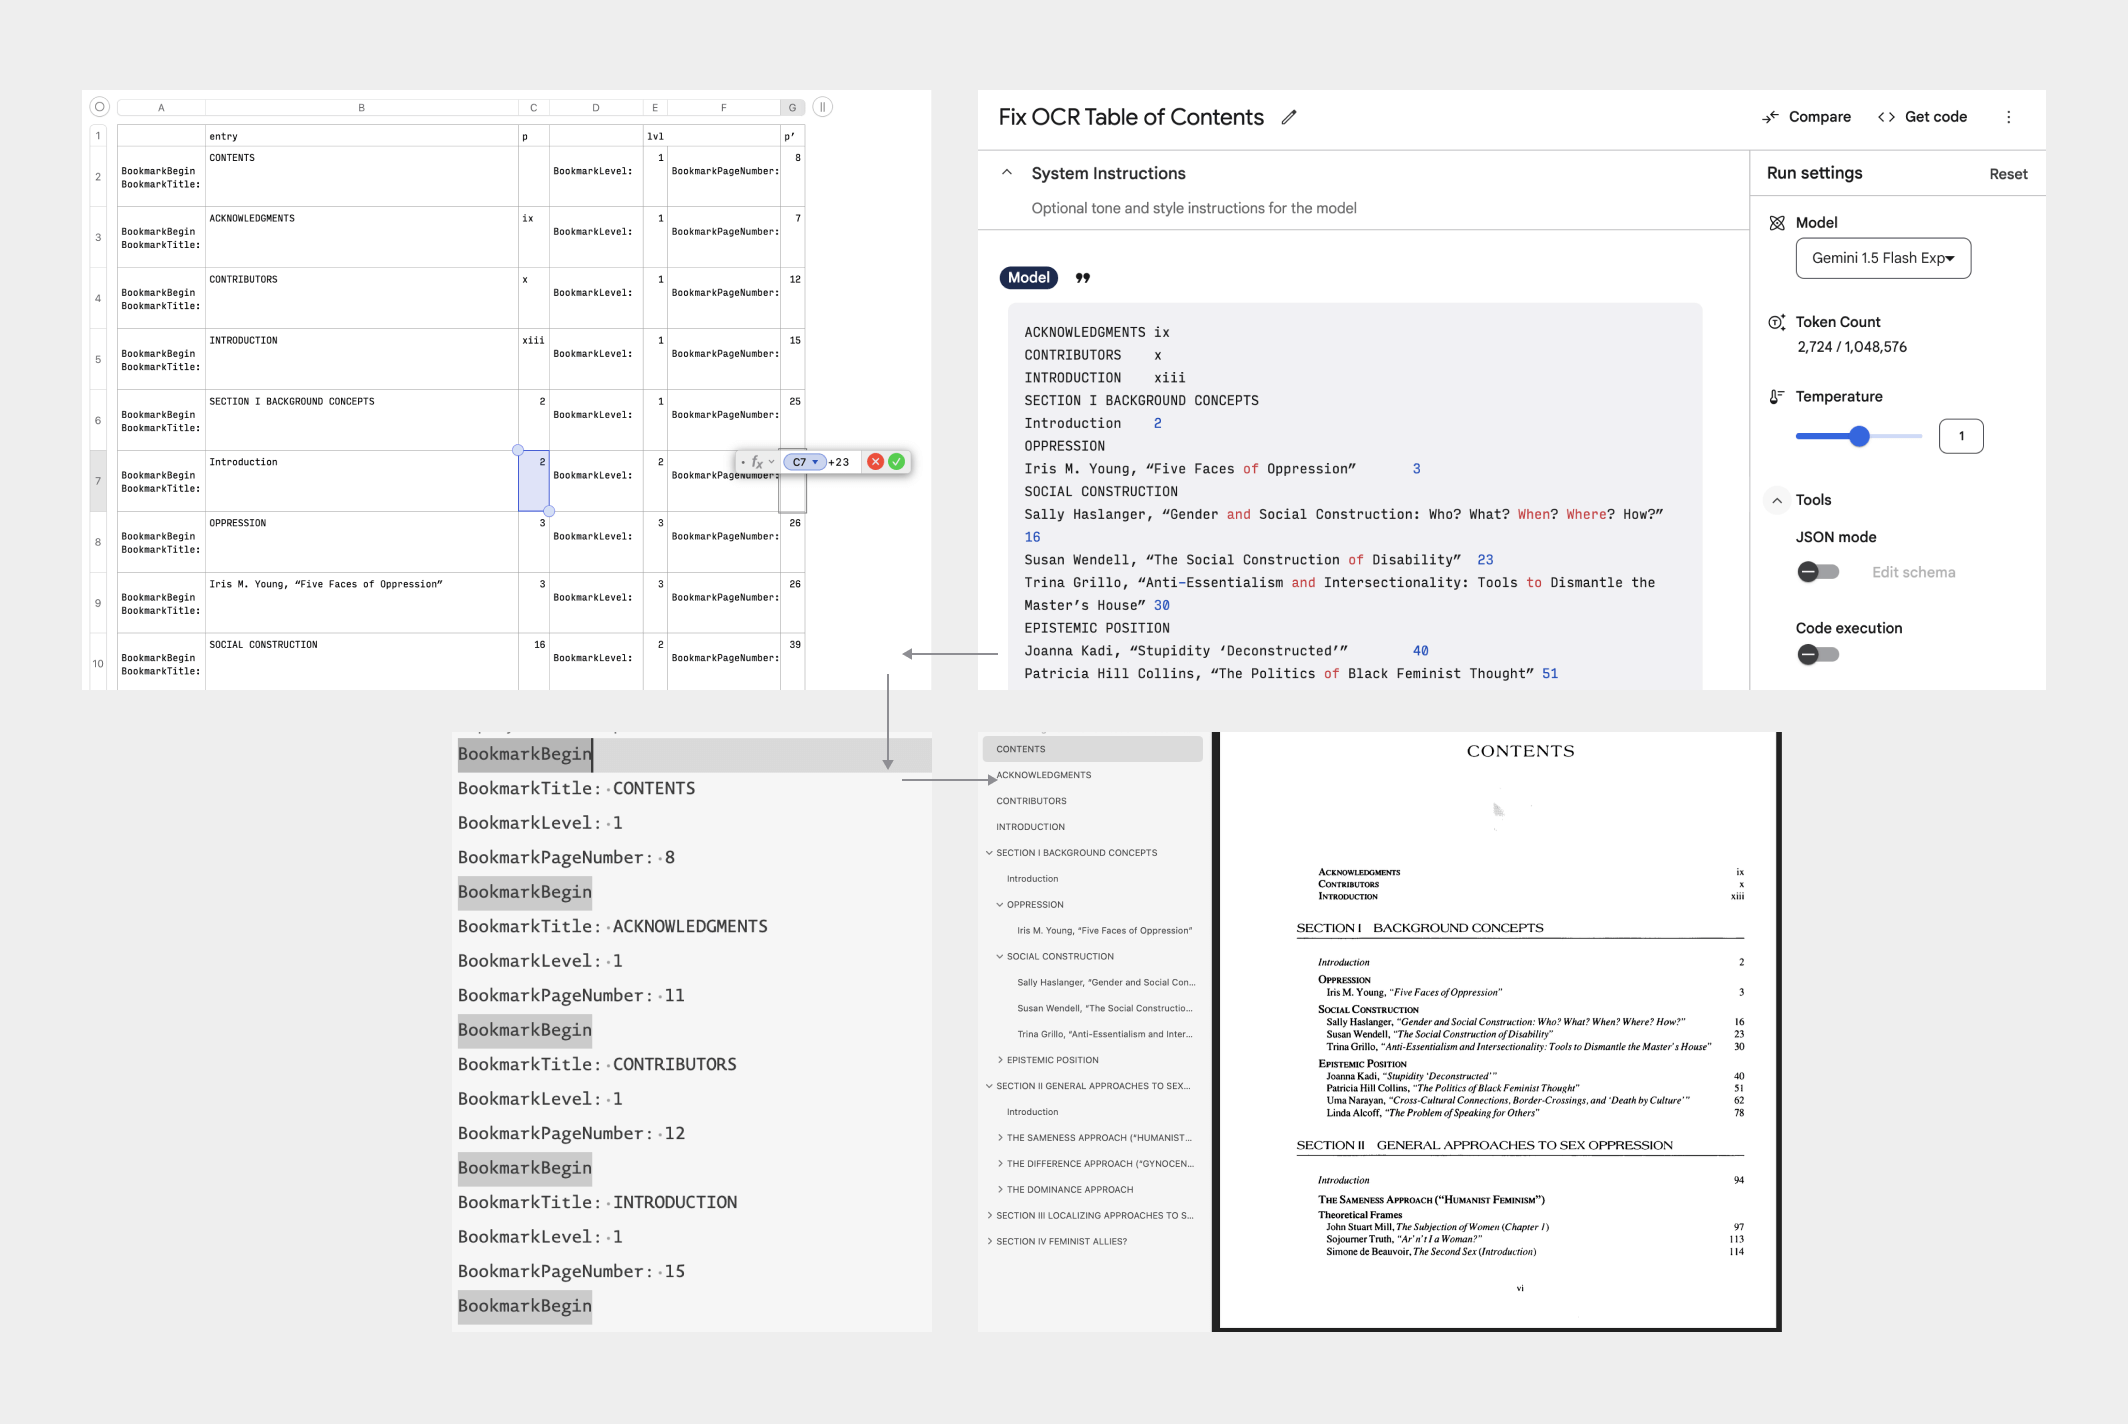
Copy and paste the whole table into a text editor, delete all tabs, and that would be the data file needed to generate the ToC. Note that PDFtk mentions in its documentation that all non-ASCII characters must be encoded in HTML entities, and if your ToC isn’t pure ASCII, you can encode the file with he:
npx he --encode < toc.txt > toc.encoded.txt
Finally, write the data file into PDF:
pdftk book.ocr.pdf update_info toc.encoded.txt output book.ocr.toc.pdf
With this done, I successfully got an optimized digital copy of the book that’s 1/10 the size of the version delivered by 1DollarScan and more readable with better contrast, more accurate OCR, and a navigable ToC.
Chinese Translation
使用体验
上个月,我在一个开放课程的阅读材料中看到一本很老的教材,有点兴趣想看看,但为了这个海淘既不方便也没必要。况且这本教材实际上是个读本,有接近六百页厚,本来就只适合零敲碎打地翻看,实体版那种砖头想想还是算了。
随后就我就想到了逛 Hacker News 的时候看到过好几次有人提及一种寄送扫描服务,可以远程帮你把实体书扫成电子版,就决定试试相对有名的 1DollarScan.com。
1DollarScan 的服务流程大致是,你把书寄给他们,或者直接下单到他们的地址,他们会帮你切开书脊扫描,发给你 PDF,然后直接回收。当然你可以找个打印店帮你这么做,但 1DollarScan 的优势是把整个流程产品化和自动化了。
我想要的那本书在亚马逊上有二手的卖,不错成色只要 3 到 4 美元左右(原价是典型的教科书价格——140 美元,如果你也觉得这是一种犯罪,垄断就会造成这种结果);这么算下来,十美元之内就能搞到这本书的电子版,感觉可行。
下单流程
但实际成本要比这高不少。首先,1DollarScan 实际上已经变成了 1.2DollarScan,定价是每百页 1.2 美元(他们称之为「一套」[set])。套数永远是向上取整,所以最后的零头是最贵的。
还不止这些。下单的时候,1DollarScan 还兜售一些附加服务,看起来每个一两美元,倒不贵,但其实都是按套数收取的,加起来蹭蹭的。比较迷惑的是,默认选中的 OCR(1 美元)和文件名匹配书名(1 美元)几乎是应该无脑取消的,因为自己做未免太容易了。
反倒一些没有选中的更像是必选:每套多付 1 美元才能从亚马逊直接下单过去,每套多付 2 美元才能将时效从扯淡的 40-60 天缩短到 5-10 个工作日。加上以后,扫描我那本书的成本就是 ($1.2 + $1 + $2) × 6 = $25.2,比我想得高多了。(还有一个每套 2 美元的「优质处理」[high quality touch-up] 服务,可以将扫描分辨率从 300 提高到 600 dpi,还会有人手动帮你矫正扫描结果,但那对教科书肯定没必要了。)
如果你身经百战见得多了,这时候应该已经嗅到了订阅的铜臭味——恭喜你猜对了,每月交 19 美元,就可以免费扫 10 套,并且送除了高分辨率扫描之外的附加服务。虽然我一个月内也不见得会在那扫第二次,但掰手指毕竟是便宜一点,就会员了一个月,然后从美亚下单开始等。(会员似乎还是限量的,并不是一直能买。)
……等了又等。美亚快递 8 月 28 号就送到了,但后台花了两天才显示收到。至于开始扫描,已经是 9 月 5 号的事了,但是一直显示「正在裁切」,裁了五天突然跟我说扫完了。理论上,这中间总共是六个工作日(有一天美国劳动节放假),倒是在承诺的范围内,但扫一本书要这么久,体感确实够慢。
(作为对比,我同期还在淘宝上随便找了家店,从京东寄了本差不多厚的书过去扫描,一页五分钱,淘宝平均水平。收到以后两个小时不到就麻溜给我了。)
文件交付
扫完以后,他们会发一个直链,三十天有效。下载页还有一个「微调」[fine-tune] 的免费功能,就是根据你选的设备屏幕,帮你裁掉白边、压低分辨率,理论上更好读。不过上面的设备大多都是六七年以前的了,而且压得一言难尽,字都看不清了,所以还是省省吧。
至于扫描本身,图像质量总体还行,但对比度偏低,某些字母的衬线部分比较模糊;有些页面倾斜了 0.5-1 度,不是大问题,但很容易看出来。OCR 比较准确,但有的地方没处理好双栏布局。最头疼的是文件有 433 MB 大,估计就是扫描仪直出的照片拼起来的。如果这是以图为主的书,倒是挺保真的,但对于几乎都是字的教材,一本书几百兆未免太不环保了。
总之,如果打个分,我觉得 1DollarScan 的体验能得个 B-:宣传的确实做到了,但这收费也不算低了,要求价格更透明、进度更新更及时准确、文件处理更合理,应该不过分吧。
一点法律问题
很遗憾,这种图书代扫服务多少有点涉及版权问题的模糊地带。这是因为无论中美,扫描整书在性质上都属于对作品的复制行为,而复制是属于版权人的排他性权利(17 U.S.C. § 106(1);著作权法 §10(5))。因此,只有证明这么做构成合理使用,才是合法的。
至于合理使用的判断规则,美国法律规定整体考虑四个因素:(1) 使用的目的和特征,(2) 受版权保护作品的性质,(3) 使用部分的数量和比重,以及 (4) 对潜在市场或作品价值的影响(17 U.S.C. § 107);而中国法律一般被解读为依次考察三个问题:(1) 是否属于法定的合理使用情形之一,(2) 是否未影响作品的正常使用,以及 (3) 是否未不合理地损害权利人的合法权益(著作权法 §24)。
从用户的角度看,论证合理使用的理由相对充分,毕竟你已经花了钱买书,而且也只是个人自用。虽然复制了整本书,但根据美国最高法院在 Betamax 案(关于家用电视录像设备的合法性)中的观点,制作作品的完整副本供个人日后观看,属于合理使用。而且说实在的,扫一两本书自己看也不涉及几个钱,不太可能有出版商闲到来针对你。(这不是法律建议。)
但对于服务方来说,风险就要大一点。虽然在知名的谷歌图书案中,谷歌的数字化行为被判定为不侵权,但他们的扫描不是作为付费服务出售,而且公开展示的部分很有限。另一方面,最近判决的互联网档案馆一案则认定全书扫描行为不能算「转换性使用」,因此也不构成合理使用。当然,像 1DollarScan 这样的服务跟它们还不太一样,毕竟文件是一对一、短暂提供的,而不是用于公众服务。但这一论点尚未在法庭上得到检验,所以谁知道呢。此外,台湾「智慧财产局」曾答复指出读者自己扫描全书——在台湾称为「自炊」——是合理使用,但扫描店收费帮扫则可能有问题。但台湾法规条文不同,这一结论也仅能参考。
(1DollarScan 显然是知道有法律风险的,所以在多处明确声明不会扫描一批讼棍出版商出的书。)
当然,就国内使用而言,比起版权问题,这类服务更可能受到出版物管理相关规则的限制。但这也没什么好分析的,个中边界请自己评估。
优化扫描文件
前面提到,1DollarScan 发来的 PDF 对比度不够高、有的页面歪了,文件也太大。于是决定自己优化试试。
注: 我对图像处理的了解不多;以下方法是我临时抱佛脚速成的,可能有错,欢迎批评。
检查并拆分 PDF
首先看看为什么文件这么大:
pdfimages -list book.pdf
注: pdfimages 包含在 poppler 包中。
输出如下:
page   num  type   width height color comp bpc  enc interp  object ID x-ppi y-ppi size ratio
--------------------------------------------------------------------------------------------
   1     0 image    2251  2766  rgb     3   8  jpeg   no         4  0   300   300  895K 4.9%
   2     1 image    2251  2766  rgb     3   8  jpeg   no         8  0   300   300  127K 0.7%
   3     2 image    2134  2773  rgb     3   8  jpeg   no        12  0   300   300  173K 1.0%
   4     3 image    2134  2773  rgb     3   8  jpeg   no        20  0   300   300  244K 1.4%
   5     4 image    2122  2768  rgb     3   8  jpeg   no        27  0   300   300  130K 0.8%
...
也就是说虽然绝大多数页面都是黑白的,图片都用的彩色。为了调整,得先把图片都导出来:
pdfimages -j book.pdf book
这个命令输出的文件格式是 book-000.jpg、book-001.jpg,以此类推。
使用 ImageMagick 压缩黑白图片
然后就可以上 ImageMagick 了。经过各种试错,我最后找到的命令是:
for i in book*jpg; do
    magick "$i" \
        -deskew 40% \
        -level 50x100% \
        -colors 2 -colorspace gray -normalize \
        -compress Group4 proc.${i%.jpg}.tif
done
分别解释如下:
去斜: 首先, -deskew threshold{%} 选项尝试将图像拉直。根据文档,40% 的阈值适用于大多数图像,我试了确实如此。
增加对比度: -level black_point{,white_point}{%} 可以增加对比度,这样比较细的笔画就不会看不清了。这里,50 的黑点值是指将图片色彩范围中较暗的 50% 全部变成纯黑色。
注意,magick 的选项顺序是不能互换的:对比度调整必须在后面调成黑白之前,否则到时候浅色已经变成白色,再改就晚了。
黑白化: 接下来的几个选项会使图像变成单色。ImageMagick 本来是有一个专门的 -monochrome 选项,但它有一个副作用,会让较亮和较暗的像素都变得更加极端,在我的测试中,会导致一些页面出现伪影。
因此,我改用 -colors 2 和 -colorspace gray 的组合,这是指把原图压缩到只用两种颜色,然后变成灰度图像。之后, -normalize 选项进一步拉伸黑白对比。
压缩和输出格式: 最后阶段,-compress Group4 选项应用了 Group4 传真压缩,它对于黑白纯色图片特别高效,并以 TIFF 格式保存。我的测试中,这个组合能将所有页面的体积减少接近 90%。(还有种更节约空间的 JBIG2 算法,但我没有找到通过 ImageMagick 直接输出的方法。如果你后续用 OCRmyPDF 或 Acrobat 处理 OCR,它们会帮你转换成 JBIG2。)
单独处理含图页面
上面的命令对大多数页面都有效,但也有例外。书里有一篇文章包含大量图片,压缩成纯黑白效果就不好了。对于这些页面,我改用了以下命令:
for i in {408..424}; do # 单独处理的页面范围
    magick "$i.jpg" -deskew 40% -colorspace gray -depth 4 "proc.$i.jpg"
done
这里,我没有再压缩成纯黑白,而是用 -depth 4 选项压缩成 16 级灰阶。然后把输出的 JPG 用 ImageOptim 以 60% 质量再压缩一遍。最终结果比原图大约小了 40%。
执行 OCR
优化了单个页面后,接下来重新拼起来执行 OCR 就行了。如果要用开源工具,tesseract 识别英文文档就挺不错:
find . -name 'proc*' | sort | tesseract - book.ocr pdf
这里,- 从 STDIN 读取输入,后两个参数分别是文件名(不带扩展名)和输出格式。
然而,tesseract 在测试的时候分不清分栏文本,所以我最后还是用回了 Acrobat,识别结果非常完美。(谁都烦 Adobe,但必须承认它在 PDF 处理方面仍然一骑绝尘,处理 CJK 文档就更是这样了。)
创建目录
我最后想在文件里嵌一个目录。为此,虽然可以在 Acrobat 里手动标记,但那样就太繁琐了。
然后发现可以求助于 PDFtk,它支持通过命令和模板将目录写入 PDF。为此,需要准备一个书签数据文件,格式如下:
BookmarkBegin
BookmarkTitle: (title)
BookmarkLevel: 1
...
注: PDFtk Server 官方安装包中的版本已经无法在 Apple silicon 上运行了,需要用 Homebrew 里的 pdftk-java 包。
但是如何获取标题和页码呢?如果是在过去,我大概会从 OCR 处理过的目录页中复制文本,并使用一些正则表达式和 vim 技巧清理。但现在是 2024 年,所以更简单的方法是让一个 LLM 为你跑腿,像 Gemini Flash 和 GPT Mini 这样的廉价型号就足够了。以下是我的提示词:
The text below is copied from an OCR’ed table of contents. Try to fix errors,
extra/missing spaces, and other artifacts introduced by OCR and separate the
entry and page number with a tab (\t). Note that some entries may span two
lines, but your result shouldn’t break within an entry. Output in a code block.

[粘贴目录页的 OCR 文本]
Gemini Flash 的结果完全符合要求。
然后需要考虑纸质版和电子版之间的页码差异。为此,将输出粘贴到电子表格中(所以刚才要求模型输出制表符分隔的结果),并使用公式和自动填充创建一个新列,其中的数字等于实体书页码加上一个固定差值(自己掰手指算算就行了)。
接下来,隐藏物理页码列,创建三个包含数据文件模版中重复部分(包括换行符)的新列,如下图所示。
将整个表格复制并粘贴到文本编辑器中,删除所有制表符,这就是生成目录所需的数据文件。不过注意 PDFtk 在其文档中提到所有非 ASCII 字符必须编码为 HTML 转义形态,如果你的目录不是纯 ASCII(比如有中文),可以使用 he 来编码:
npx he --encode < toc.txt > toc.encoded.txt
最后,将数据文件写入 PDF:
pdftk book.ocr.pdf update_info toc.encoded.txt output book.ocr.toc.pdf
这样一来,一份经优化的电子版就做好了,大小只有 1DollarScan 直出版本的 1/10,并且对比度更清晰、OCR 更准确,还有方便阅读的目录。